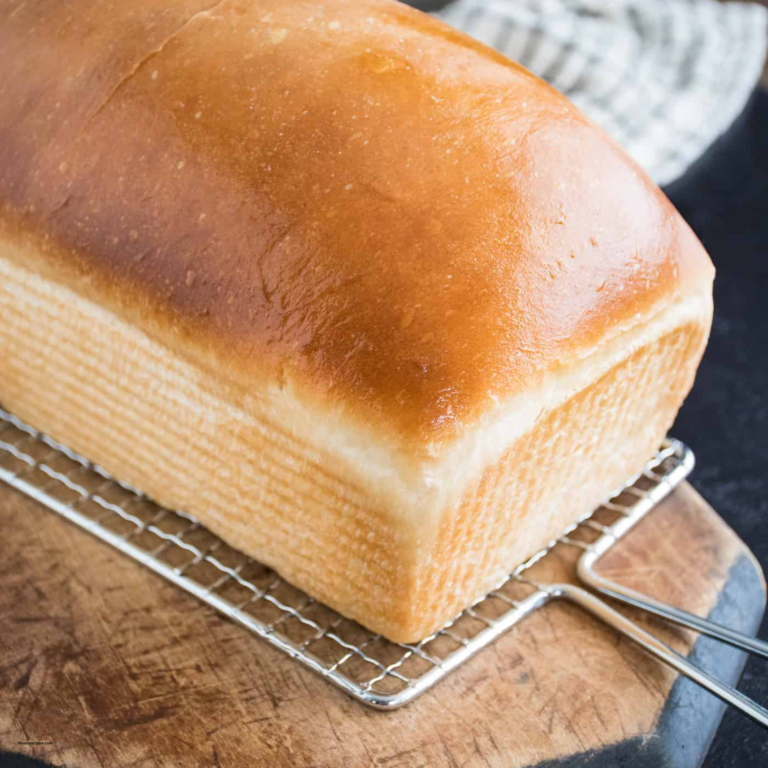
Gluten Free Pizza Dough: Easy Recipe
Why this recipe works (and why you’ll love it)
If you want a foolproof, easy gluten free pizza crust that tastes like real pizza, this 5 ingredient dough is your new go to. It’s quick to make, uses pantry staples, and gives a crisp edge with a soft, chewy center. Perfect for beginners and busy cooks who still want fresh, homemade pizza without the wait.
Table of Contents
Ingredients (5 simple ingredients)
Makes one 10 to 12 inch pizza (or two small personal pizzas)

- 2 cups (240 g) gluten free all purpose flour blend (1:1 blend with xanthan gum recommended)
- 1 tablespoon instant yeast (or active dry yeast; see notes)
- 1 teaspoon sugar (feeds the yeast)
- 1 teaspoon salt
- 1 cup warm water (about 105–110°F / 40–43°C)
- 2 tablespoons olive oil (not counted as one of the 5 core but essential for texture)
Substitutions: If your blend doesn’t contain xanthan gum, add ¾ teaspoon xanthan gum to help elasticity.
Equipment
Large mixing bowl
- Wooden spoon or dough scraper
- Baking sheet or pizza stone
- Parchment paper (optional)
- Kitchen scale (recommended for best results)
Step-by-step Instructions

Step 1 — Activate the yeast (if using active dry yeast)
If you’re using instant yeast, you can skip this and mix it dry with the flour. For active dry yeast, stir the yeast and sugar into the warm water and let sit 5–10 minutes until foamy.
Step 2 — Mix dry ingredients
In a large bowl whisk together the gluten free flour, salt, and (if needed) xanthan gum.
Step 3 — Add wet ingredients
Create a well in the center and add the warm water (with activated yeast, if using) and olive oil. Mix with a wooden spoon or spatula until a sticky dough forms. The dough should be tacky but not soupy; add a tablespoon of flour if too wet, or a tablespoon of water if too dry.
Step 4 — First rest (short proof)
Cover the bowl with a clean towel or plastic wrap. Let the dough rest in a warm spot for 20–30 minutes. The dough won’t double like wheat dough, but you should see slightly more volume and small bubbles.
Step 5 — Shape the crust
Preheat oven to 475°F (245°C) use a pizza stone if you have one. Place parchment on a baking sheet. Lightly oil your hands and transfer the dough to the parchment. Pat or press the dough outward with oiled hands into a 10–12 inch circle, creating a slightly thicker rim. For a crispier bottom, preheat the stone and slide the parchment directly on it.
Step 6 — Par bake (for crispier crust) — optional but recommended
Bake the plain crust for 6–8 minutes until it starts to set and edges barely color. Remove and add toppings.
Step 7 — Add toppings & finish baking
Top with sauce, cheese, and toppings (avoid overly wet toppings). Bake 8–12 minutes more until cheese bubbles and crust is golden. Baking time varies by oven and thickness.
Step 8 — Rest, slice, serve
Let pizza rest 3–5 minutes before slicing. Drizzle with olive oil or finish with fresh basil if desired.
Tips for the best gluten free pizza crust

- Use a 1 gluten free flour blend labeled to replace wheat flour cup for cup it’s the easiest.
- Don’t overload toppings too much moisture makes the center soggy. Pre cook wet veggies (mushrooms, zucchini) if needed.
- Par baking gives a crisp bottom and prevents sogginess.
- Bake hot and fast (475–500°F) for best crust color and texture.
- Oil your hands and tools when shaping to avoid sticking.
- Add herbs to the dough (1 tsp dried oregano or garlic powder) for extra flavor.
Serving ideas
- Classic Margherita (tomato, fresh mozzarella, basil)
- BBQ chicken (BBQ sauce, cooked chicken, red onion, cilantro)
- Veggie supreme (roasted peppers, caramelized onion, spinach)
- Make into mini calzones or garlic knots with leftover dough
Storage & reheating
- Refrigerate: Store baked pizza in an airtight container for up to 3 days.
- Freeze: Freeze baked slices in a single layer on a tray until firm, then transfer to freezer bags for up to 2 months.
- Reheat: Reheat slices in a toaster oven or skillet to restore crispiness. Avoid microwaving (it makes crust chewy).

Notes (longer, helpful)
Yeast choice: Instant yeast mixes directly into the flour and gives slightly faster results. Active dry yeast needs activation in warm water with sugar first. Either works here.
- Flour blends vary: Different brands produce different textures. If your dough is crumbly, add 1–2 tsp more water next time. If it’s gummy, increase flour by 1–2 tsp. Keep notes on the brand you prefer.
- Xanthan gum: If your flour blend lacks a binder, add xanthan gum. Too much gum makes the crust gummy; too little makes it crumbly stick to the recommended amount.
- Hydration: Gluten free flours absorb water differently. This recipe is forgiving adjust by tablespoon increments.
- If you want a chewy Neo style crust: Add 1 tablespoon honey to the dough and allow a 40–60 minute warm rest (longer ferment improves flavor).
Special Notes (before disclaimer)
For best results, always check ingredient labels for “gluten free” certification if you or your guests have celiac disease cross contamination during processing can occur. If serving to guests with severe allergies, clean surfaces and utensils thoroughly and use dedicated tools. Also, if you’re baking on a pizza stone, dust the stone with a tiny amount of gluten free cornmeal or rice flour to make sliding the pizza on and off easier.
Love this recipe?
If you made this Gluten Free Pizza Dough and loved it, please leave a comment and star rating below and tell us which flour blend you used! Your feedback helps others find a crust they’ll actually enjoy. Thank you!
Nutrition (approximate per whole pizza varies with toppings)
Calories and macros depend heavily on flour blend and toppings. Expect roughly 700–900 kcal for an entire 10–12″ pizza crust (without toppings). For accurate tracking, enter your exact ingredients into a nutrition calculator.
FAQs (fast answers for searchers)
Q: Can I use almond flour or coconut flour?
A: Not directly those single ingredient flours behave differently. Use a purpose made gluten free all purpose blend for best pizza texture.
Q: Can I make dough ahead?
A: Yes make dough, cover tightly, and refrigerate up to 24 hours. Bring to room temp before shaping. You can also freeze the dough for up to 1 month.
Q: Is this recipe dairy free?
A: The dough is dairy free. Choose dairy free cheeses if you need a fully dairy free pizza.
Q: How do I get a crispier crust?
A: Par bake the crust, use a hot oven (475–500°F), bake on a preheated stone, and avoid wet toppings.
Disclaimer (last)
This recipe is for informational and cooking purposes only. Always read labels to ensure products are certified gluten free if you have celiac disease or a severe gluten intolerance. I’m not a medical professional consult a doctor or dietitian for personalized dietary advice. This post may contain affiliate links; I receive a small commission at no extra cost to you if you purchase through them. I only recommend products I use and trust.